dinsdag 22 januari 2013

How to make your own redscale

how to

This is one of the most awesome things to do if you want those cool vintage pictures.

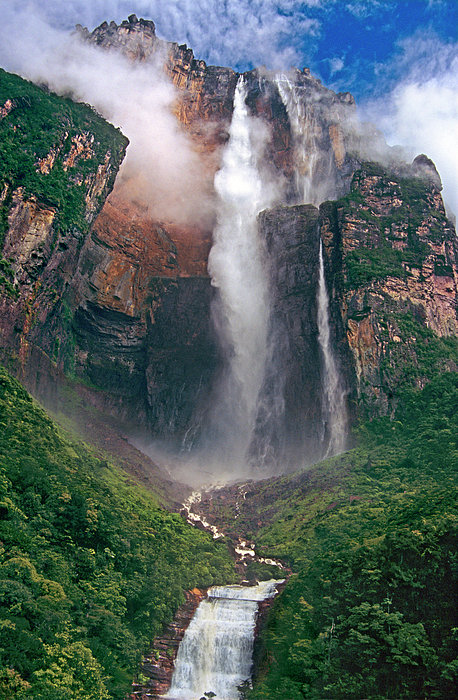
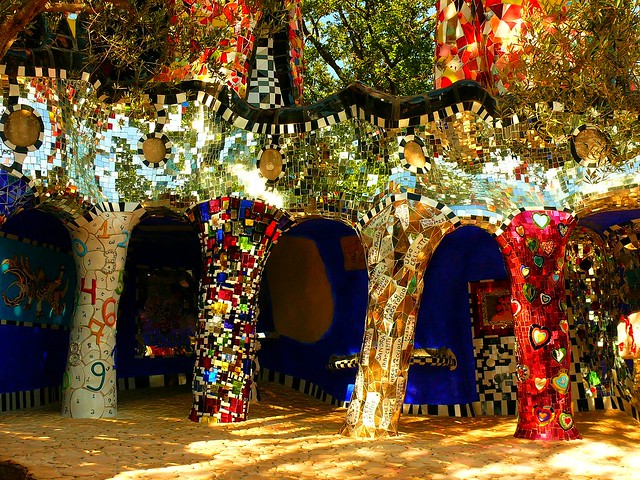
This is what a redscale picture looks like:

redscale


Let me explain:

What is redscale?

Film uses different layers of light sensitive film. When you take a picture with a normal film, the red layer is the last layer to be exposed to the light. That means the back layer is the red one.

A redscale has the red layer of the film in front. So basically, redscale is film exposed from the other side.


How do you make it yourself?

You can buy your own redscale at the lomography store. But making your own redscale is fun, and a lot cheaper!

What you need:

  • A completely dark room, or a dark bag for film(you can buy those at your local photography shop)
  • A film you can’t use. (Film A) (Already exposed, from a thrift shop camera, expired etc.)
  • Your film you want to turn into a redscale. (Film B)
  • scissor
  • tape

Making the redscale:

  • Take film A and pull out all the film, then cut off the most of the film. Leave about 3cm on there. (you can do this in a room whit the lights on)

1

  • Get all your stuff into your dark bag or room. Make sure to place them before you turn off the light so you know what is where.
  • Make sure your room (or bag) is completely dark. Only if you’re sure your place is completely dark, go to the next step.
  • Again, YOU NEED TO DO THIS IN COMPLETE DARKNESS! Grab film B and cut off the first 4cm. You have to cut of the thin part.

foto 2

  • Now take the almost empty film canister from film A. Turn around the film B and tape those two parts together. So the good side of film A is taped to the “wrong” side of film B.

foto 5

foto

  • Now wind up the empty film until your canister from film B is empty, and film A is full.

foto 4

  • Cut the two films apart and then cut in the thinner part a normal film has in the beginning of film A.

bbhj

foto 1


VOILAH! Load your film into your camera, and you have got your own home made redscale film!

Sorry for the crappy drawings, but it looks easier with the pictures.

OH! One more thing: For the best results, shots need to be over exposed by one or two stops to achieve correct exposure on developing. And don’t forget to tell the person who is developing the film there is tape at the end of the film!!! If you don’t, the developer could crash his machine (if the developer does his or her film development with a machine)

HAVE FUN SHOOTING AWESOMENESS!

maandag 21 januari 2013

100 followers GIVEAWAY! Win a camera!

100th-4_thumb[5]

Yes! its finally time again! I had promised you guys to do another giveaway as soon as I hit 100 followers! Go follow me and enter the giveaway!

I will personally put all of your names on a piece of paper and put them all in a bag. I pull out ONE of the names out on Saturday!

How to make a chance to win:

  1. Make sure you are following me (on glipho), if you’re not, you can’t win.
  2. Choose which of the cameras you want.
  3. Comment the name of the camera you would like to have on this post.
  4. Wait for one week. I will give you guys until Saturday.
  5. If you don’t have an e-mail somewhere on your profile or blog, please put it in the comment.
  6. You will make a bigger chance to win if you share this article on twitter too! I will put your name in the hat two times if you have shared it! If you do, please write #VintageCameraGiveaway1210 in your tweet so I can find it!

That’s easy right? Now let me show you what cameras you can win!

1) The concord 118.

This is such a fun camera! I brought a similar one with me to Turkey last year and had so much fun taking beautiful! I highly recommend you to bring it with you on vacation. Its so small (just over 10cm wide and 2cm high) it fits in your pocket! Your own little spy camera! It uses 110mm film. You can buy it here.

cam_thumb[1]

camcam_thumb[1]

2) The Kodak Instamatic 33

This super cute camera is a camera which was developed in the 1960s to simplify the use of film. It uses a 126 mm cartridge. Unfortunately it isn’t sold anymore. You’re lucky if you find it on Ebay!

foto-2_thumb1

foto-4_thumb1

So go post a comment which one you want! I will announce the winner of the camera in a blog post next week (Saturday).

WOOHP!!

zaterdag 19 januari 2013

Analogue Istanbul

I have been to Istanbul a few months ago. I took my Olympus OM-10 with me and started shooting with a film I had bought there. I completely forgot to develop it! How stupid. So I found the film last week and decided to develop it. So here is a little bit of Istanbul in analogue pictures. The pictures aren’t the best quality. The film I had bought there probably has been cooking and boiling in that shop for years. But there are some nice pictures showing how beautiful Istanbul is!

I really loved it! The weather, the nice people, the beautiful Blue mosque, Hagia Sophia, and the Sultanahmet Topkapi palace are definitely worth visiting! The buildings have beautiful details like paintings or carvings, and an interesting history. And don’t forget the food! YUMM!

Istanbul has a river going right trough the center. If you want to get to the other side, you have to walk over a big blue bridge. Dozens of people fish there!

LARGE16

What I really loved was the bazaar. Well, there actually where a lot of them! I had bought some delicious spices there! So many colors and smells YUM!

LARGE18


LARGE17

I loved the old buildings and the chaos on the streets! If you see one of these little kiosks, try the round breads with cheese or the corn!

LARGE19


This is the blue mosque, You really have to go there if you can! Its so beautiful!


LARGE07

LARGE06

So here are some random leftover pictures! Thanks for reading!

LARGE10


LARGE12


LARGE14

Yeah.. Dunno what happened in this picture. I think I didn't wind my film all the way…

LARGE15

And…. I’VE GOT 100 FOLLOWERS! I’m giving away some awesomeness again! be sure to follow me if you want to make a chance of winning! (On glipho only). The giveaway post will be online on Monday!


.

vrijdag 11 januari 2013

5 Minute Cake.

I hate when I really want to try out my cake and I have to wait for an hour for it to be completely finished. Do you guys have that sometimes?

Well, I’ve got the solution! This super delicious cake is done in just 5 minutes!

What you need for one big one or two small ones:

  • 2 big mugs that you can put in your microwave.
  • 4 tablespoons self raising flour
  • 4 Tablespoons granulated sugar
  • 1 Egg
  • 3 Tablespoons Cocoa Powder
  • 3 Tablespoons Nutella (hazelnut chocolate spread)
  • 3 Tablespoons milk
  • 3 Tablespoons olive oil

Making it:

I made a small one, which was more than enough. I put all the ingredients together and then I mixed it until it was like a thick paste. Then you pour the mix into the two mugs (or one bigger mug) and put it in your microwave for about 2,5-3 minutes.  You can finish it any way you like, with powdered sugar, whipped cream or serve it whit fruits… what you want….

It’s really that simple! Go try it yourself! I wasn’t a big fan of microwaving stuff because it would get so dry, but this… YUM!

Have fun!

.

zondag 6 januari 2013

5 places I’d love to go.

I have traveled to e few places in my life. Thanks to my parents, who brought me and my brother with them as much as possible. My dad needed to travel a lot for his work and we would go with him. But there are a few places in the world I have never been that I really want to see. This list contains 5 places I just HAVE to go. There are a lot of places I want t go though. this are just 5 random places. Number 1 isn’t better than number 5. Well, have fun reading, and if you have been to one or more of these 5 places, please let me know!


Number 1

The underwater museum, Cancun.

This is just amazing! This museum in Mexico is actually under water! You have to actually dive to see the more than 400 life-sized sculptures on the bottom of the ocean!


Number 2

Angel Falls, Venezuela.

This beautiful waterfall is worlds highest waterfall! It has a height of  979 meters! Isn’t that amazing?

Number 3

The garden from Niki de Saint Phalle, Italy.

These garden is called the tarot garden. It was made by Niki de Saint Phalle. She is an artist that really inspires me. She actually died doing what she loved to do. The materials she used to build sculptures like these where so toxic she died. But she left this beautiful garden with beautiful sculptures you can actually walk in to!


Number 4

Tian Tan Buddha on Lantau Island, Hong Kong.

This is a monastery in Hong Kong! It has a gigantic buddha on the top! Isn’t that amazing? I really want to see this in real life.


Number 5

Tokyo, yep, the city!

I got into a conversation a few days ago. On glipho atctually. I got the tip tip to visit Tokyo once. I started google-ing it and WOW! I really like this!

AWYEAH! FOOD!

What are the places you really want to go?

zaterdag 5 januari 2013

Muddy, hairy, light.

IMG_9167

I was going trough my pictures on my mac. I was surprised how much pictures I have on there that I forgot about. Some of those pictures where from a school assignment. I think it was about a year ago. Its was for my cultural arts class. I Made a design and a product out of a story. Its kind of a weird story thought. It comes down to a bunch of people living in a big swimming pool filled with mud.

I drew a couple of ideas and designs. Then I did some research on what material I could use.

foto 2

foto 5


After making those designs, I bought silicone sealant (that stuff you use in your bathroom), a wig and some paint.


See here, the result:


tadaaah

IMG_9225
I also had a photo-shoot together with two others, which was Josephines Idea. She wanted to do something in this theme too. So she got her boyfriend Jeroen (he is a photographer) to take the pictures. So here are a few of those pictures.

This is me:

IMG_9164

IMG_9167

These are Josephine and Coen:

IMG_9191

Josephine has an instagram account: http://instagram.com/pineapplepickles/

Jeroen has a facebook photography page: http://www.facebook.com/pages/Jeroen-G-Bakker-photography/461774047176376

woensdag 2 januari 2013

Beginners guide–Double exposure

I have just recently been working on double exposures myself, but the pictures I saw on the internet of double exposures made me so exited about it. I’m still figuring out how to make the best double exposures, but I thought to share it anyway. So here is a double exposure that made me want to make double exposures myself. I ‘m still a beginner myself so I ‘m not capable of doing something like this yet.
Analog Double Exposure Photographs by Florian Imgrund multiple exposures black and white
This picture was made by Florian Imgrund.

Isn’t this awesome?! I love how the dark parts of the picture are filled with another picture. And its actually quite simple. The only thing I was struggling with was not winding the film at all. Let me show you what I made with my Olympus trip  35 and how I did it. Again, I am still experimenting with different cameras and films, so they’re not good at all.

So this one came out best. I didn’t plan on having a half frame double exposure. But I was quite surprised about the outcome. I didn’t expect the other picture would come exactly on one half of the cola bottle.
adf61e3e1c4601cd105626fc3cf7613fecaf3f6e
This one was a little less. It’s a triple exposure which caused the picture to be way over exposured. If you look closely you can see two bubbles over each other. I used an 400 ISO film, If I had used an 100 ISO film it would have been better.

How do you make a double exposure?
To get the best double exposures like the picture from Florian Imgrund, you should do the following:
You think of the picture you want to make. Then the best is to first take a picture with the darker object. The next picture that you take will be in that dark object, so make sure there is enough light around that object. That way you will only have your dark object filled and not other parts of your picture.
So when you have the first picture, you want to take another picture on the same part of the film you just exposed. So you don’t want to wind your film. To do so, you have to hold your rewind button. That way, you can ‘wind’ your film without actually winding your film. So push it, hold it until you are done winding. Then take another picture!
The most cameras have their rewind button on the bottom of the body.

Some have a rewind button on the front:
rewind
If you cant find it anywhere, you can comment me on this post. Tell me what camera you have, I’ll find it.
There is one other way to make awesome double exposures. A filmswap. I will do a complete post on that later. I’m currently working on a filmswap with Maria Nichol.
You take pictures with a camera in –for example- a city you like. Then you take out your film and send the film to someone else. Then that person puts the same film in their camera, and take pictures over that pictures. That way, you get –for example- London and Amsterdam in the same picture!
That was it for today! Have fun shooting your double exposures and show me the results if you can!!